Chalk ProBrush - Illustrator tutorial chalkboard poster

This months freebie is a unique illustrator brush set (2 brushes, a elements set and 2 free chalkboard backgrounds) which will enable you to create awesome chalkboard signs for any purpose. Also we decided to write a tutorial on how to use these brushes.
This tutorial will take you through the process of creating a chalkboard as the one shown above.
- Create a new document. Choose width: 500px and height 800px.

- Select the “Rectangle Tool” and draw a black rectangle with the same size as the grid (500px x 800px)

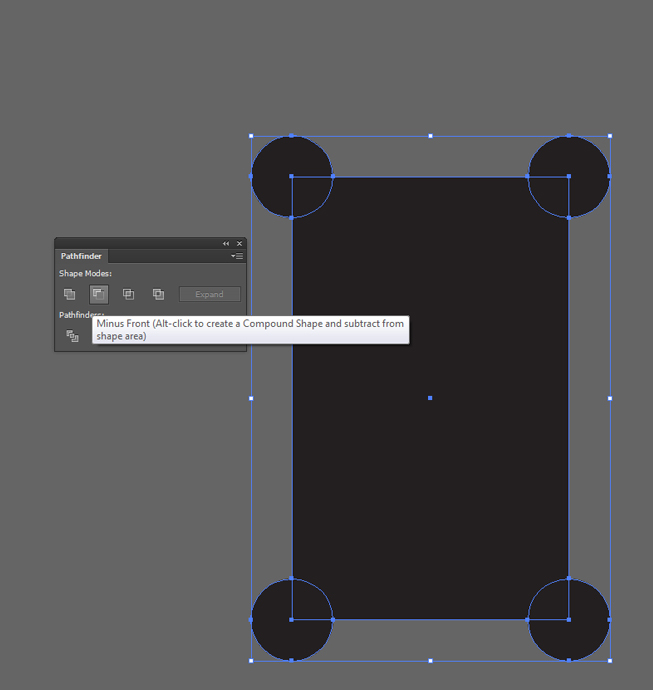
- Copy the black rectangle and add circles on all for corners of the rectangle as is shown on the image below. Now us the Selection tool to select the rectangle and the circles on it. After you selected them use ‘Minus Front’ in Pathfinder.
- Remove the fill color and add a white stroke with one of the bonus brushes.

- Use the line segment tool to create 2 lines.(1) Copy the bottom line and paste it in front. Use the Type tool (T), holding down the Opt/Alt keys and click on the line as shown on the image.
(2) Write your text using the “Park Lane NF” typeface (which you can download for free here) and move the text to the middle. Select the text and in the menu go to “Object > Transform > Shear”. At “Shear Angle” write 20 degrees and click on OK.
- With the Line Segment tool create one straight line and click on the Rotate Tool (R).
Use the Rotate tool, holding down the Opt/Alt keys and click on the bottom anchor.
In Angle write again 20 degrees and copy (not OK!) with holding Cmd/Ctrl and pressing D.You should get the following result:
- In this step we are going to repeat the fifth step and add a new word.(1) Copy the bottom line and paste it in front. Use the Type tool (T), holding down the Opt/Alt keys and click on the line as shown on the image.
(2) Write your text using the “Delectable Font” typeface (which you can download for free here) and move the text to the middle. Select the text and in the menu go to “Object > Transform > Shear”. At “Shear Angle” write 20 degrees and click on OK.You should get the following result:
- Copy the text and lines saying “The finest quality” and paste them at the bottom, where in the image you see “Real taste”. All you need to do here is change the text. See the image below for an impression of how this should look.

- In this tutorial we won’t go into details on how to create the coffee cup. In the downloaded zip folder you will find a illustrator file called “ProBrush Chalk Elements”. This document contains the coffee cup element that you can use.Copy paste the coffee cup element from the bonus elements file to your new files.
Select the coffee cup and shear it (Click on “Object > Transform > Sheer).
In the Shear angle field enter 20 (degrees) and click on OK.Now select the cup and move it to the top on the first line. Click on the anchor and rotate it like in the image below.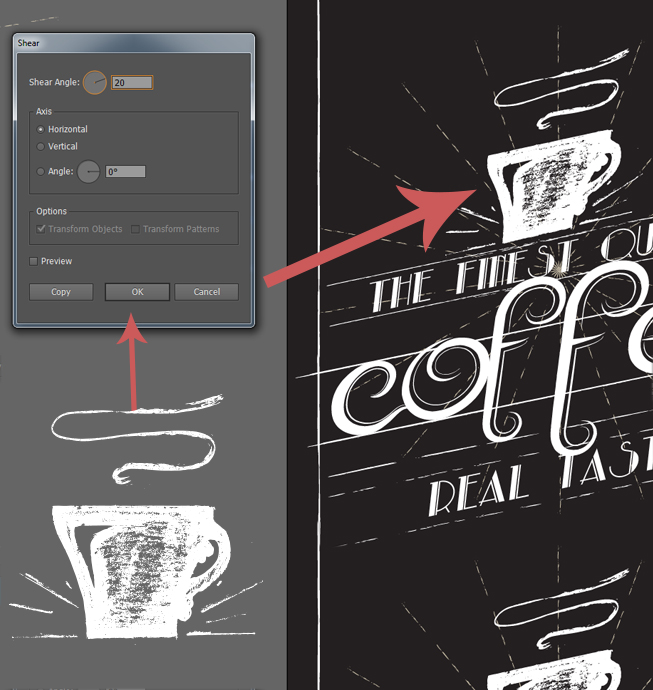
- Using the “Elipse” tool (L), create an elipse.
Select the Pencil Tool (N) and draw a line like the image below and add it in the Elipse to make it look like a coffee bean. Copy/paste a few of these beans and move them around the coffee cup and at the bottom text line.
- Select and duplicate the beans and the coffee cup and move them to the corners of the poster until it looks like this:

- Using the Breamcatcher-Regular font (which you can download for free here) add some text using the Type Tool (T) to the bottom of the poster.

- We can use the Line Segment tool to create a few more lines to finish the poster as you can see on the image below.We do this with line duplication. Move the line to a distance below the current one holding the Opt/Alt keys. This action will lead to the creation of a duplicate line. Now use the Cmd / Ctrl + D shortcut a couple of times to repeat the last action.

- The result is a poster that should look something like this:

Now it is time for you to get creative and start making your own unique posters.